DHCP-client
Summary
DHCP-client in RouterOS is capable of being a DHCPv6-client and DHCP-PD client. So it is able to get a prefix from DHCP-PD server as well as DHCPv6 stateful address from DHCPv6 server.
Quick setup example
This simple example demonstrates how to enable dhcp client to receive IPv6 prefix and add it to the pool.
Detailed print should show status of the client and we can verify if prefix is received
It works! Now you can use this pool, for example, for pppoe clients.
Properties
Sub-menu: /ipv6 dhcp-client
Script
It is possible to add a script that will be executed when a prefix or an address is acquired and applied or expires and is removed using DHCP client. There are separated sets of variables that will have the value set by the client depending on prefix or address status change as the client can acquire both and each of them can have a different effect on the router configuration.
Available variables for dhcp-client
Status
Command /ipv6 dhcp-client print detail will show current status of dhcp client and read-only properties listed in table below:
To determine what IAID will be used, convert internal ID of an interface on which DHCP client is running from hex to decimal.
For example, DHCP client is running on interface pppoe-out1. To get internal ID use following command
Now convert hex value 15 to decimal and you get IAID=21
Menu specific commands
| Property | Description |
|---|---|
| release (numbers) | Release current binding and restart DHCPv6 client |
| renew (numbers) | Renew current leases. If the renew operation was not successful, client tries to reinitialize lease (i.e. it starts lease request procedure (rebind) as if it had not received an IP address yet) |
Application Examples
Use received prefix for local RA
Consider following setup:
Manual:IP/DHCP Server

Applies to RouterOS: v3, v4, v5+
Contents
Summary
Standards: RFC 2131, RFC 3315, RFC 3633
Package: dhcp
The DHCP (Dynamic Host Configuration Protocol) is used for the easy distribution of IP addresses in a network. The MikroTik RouterOS implementation includes both server and client parts and is compliant with RFC 2131.
The router supports an individual server for each Ethernet-like interface. The MikroTik RouterOS DHCP server supports the basic functions of giving each requesting client an IP address/netmask lease, default gateway, domain name, DNS-server(s) and WINS-server(s) (for Windows clients) information (set up in the DHCP networks submenu)
In order for the DHCP server to work, IP pools must also be configured (do not include the DHCP server’s own IP address into the pool range) and the DHCP networks.
It is also possible to hand out leases for DHCP clients using the RADIUS server; the supported parameters for a RADIUS server is as follows:
Note: DHCP server requires a real interface to receive raw ethernet packets. If the interface is a Bridge interface, then the Bridge must have a real interface attached as a port to that bridge which will receive the raw ethernet packets. It cannot function correctly on a dummy (empty bridge) interface.
Quick Setup Guide
RouterOS has a built in command that lets you easily set up a DHCP server. Let’s say we want to configure DHCP server on ether1 interface to lease addresses from 192.168.0.2 to 192.168.0.254 which belong to the 192.168.0.0/24 network. The gateway and DNS server is 192.168.0.1.
From /ip dhcp-server menu run setup command and follow instructions:
The wizard has made the following configuration based on the answers above:
Starting from v5.8 RouterOS supports IPv6 prefix delegation according to RFC 3315 and RFC 3633.
Starting from v5.9, DHCPv6 server configuration was moved to /ipv6 sub-menu. Read-more >>
General
Sub-menu: /ip dhcp-server
Menu specific commands
| Property | Description |
|---|---|
| setup ( ) | Start DHCP server setup wizard, which guides you through the steps to easily create all necessary configuration. Read more>> |
Lease Store Configuration
Sub-menu: /ip dhcp-server config
This sub-menu allows the configuration of how often the DHCP leases will be stored on disk. If they would be saved on disk on every lease change, a lot of disk writes would happen which is very bad for Compact Flash (especially, if lease times are very short). To minimize writes on disk, all changes are saved on disk every store-leases-disk seconds. Additionally leases are always stored on disk on graceful shutdown and reboot.
This sub-menu has only one configurable property:
| Property | Description |
|---|---|
| store-leases-disk (time | immediately | never; Default: 5m) | How frequently lease changes should be stored on disk |
Networks
Sub-menu: /ip dhcp-server network
Leases
Sub-menu: /ip dhcp-server lease
Generally, the DHCP lease it allocated as follows:
A client may free the leased address. The dynamic lease is removed, and the allocated address is returned to the address pool. But the static lease becomes busy until the client reacquires the address.
Note: IP addresses assigned statically are not probed!
Properties
Warning: The always-broadcast parameter will dynamically change. For the initial DHCP discover/offer/request/ack cycle a broadcast MAC address is going to be used, for lease renewal (request and ack) an unicast MAC address will be used. In case the DHCP Server keeps receiving DHCP requests while DHCP offer has been sent, then the always-broadcast parameter will be turned on dynamically until the DHCP lease has been renewed successfully.
Read only properties
Menu specific commands
| Property | Description |
|---|---|
| check-status (id) | Check status of a given busy dynamic lease, and free it in case of no response |
| make-static (id) | Convert a dynamic lease to a static one |
Rate limiting
It is possible to set a bandwidth to a specific IPv4 address by using DHCPv4 leases. This can be done by setting a rate limit on the DHCPv4 lease itself, by doing this a dynamic simple queue rule will be added for the IPv4 address that corresponds to the DHCPv4 lease. By using the rate-limit parameter you can conveniently limit a user’s bandwidth.
Note: For any queues to work properly, the traffic must not be FastTracked, make sure your Firewall does not FastTrack traffic that you want to limit.
First, make the DHCPv4 lease static, otherwise it will not be possible to set a rate limit to a DHCPv4 lease:
Then you can set a rate to a DHCPv4 lease that will create a new dynamic simple queue entry:
Note: By default allow-dual-stack-queue is enabled, this will add a single dynamic simple queue entry for both DCHPv6 binding and DHCPv4 lease, without this option enabled separate dynamic simple queue entries will be added for IPv6 and IPv4.
If allow-dual-stack-queue is enabled, then a single dynamic simple queue entry will be created containing both IPv4 and IPv6 addresses:
RADIUS Support
Since RouterOS v6.43 it is possible to use RADIUS to assign a rate-limit per lease, to do so you need to pass the Mikrotik-Rate-Limit attribute from your RADIUS Server for your lease. To achieve this you first need to set your DHCPv4 Server to use RADIUS for assigning leases. Below is an example how to set it up:
After that you need to tell your RADIUS Server to pass the Mikrotik-Rate-Limit attribute. In case you are using FreeRADIUS with MySQL, then you need to add appropriate entries into radcheck and radreply tables for a MAC address, that is being used for your DHCPv4 Client. Below is an example for table entries:
Alerts
Sub-menu: /ip dhcp-server alert
To find any rogue DHCP servers as soon as they appear in your network, DHCP Alert tool can be used. It will monitor the ethernet interface for all DHCP replies and check if this reply comes from a valid DHCP server. If a reply from an unknown DHCP server is detected, alert gets triggered:
When the system alerts about a rogue DHCP server, it can execute a custom script.
Properties
| Property | Description |
|---|---|
| alert-timeout (none | time; Default: none) | Time after which alert will be forgotten. If after that time the same server is detected, new alert will be generated. If set to none timeout will never expire. |
| interface (string; Default: ) | Interface, on which to run rogue DHCP server finder. |
| on-alert (string; Default: ) | Script to run, when an unknown DHCP server is detected. |
| valid-server (string; Default: ) | List of MAC addresses of valid DHCP servers. |
Read only properties
| Property | Description |
|---|---|
| unknown-server (string) | List of MAC addresses of detected unknown DHCP servers. Server is removed from this list after alert-timeout |
Menu specific commands
DHCP Options
Sub-menu: /ip dhcp-server option
With the help of DHCP Option list, it is possible to define additional custom options for DHCP Server to advertise. Option precedence is as follows:
This is the order in which client option request will be filled in.
According to the DHCP protocol, a parameter is returned to the DHCP client only if it requests this parameter, specifying the respective code in DHCP request Parameter-List (code 55) attribute. If the code is not included in Parameter-List attribute, the DHCP server will not send it to the DHCP client.
Properties
| Property | Description |
|---|---|
| code (integer:1..254; Default: ) | dhcp option code. All codes are available at http://www.iana.org/assignments/bootp-dhcp-parameters |
| name (string; Default: ) | Descriptive name of the option |
| value (string; Default: ) | Parameter’s value. |
Starting from v6.8 available data types for options are:
RouterOS has predefined variables that can be used:
Now it is also possible to combine data types into one, for example: «0x01’vards’$(HOSTNAME)»
For example if HOSTNAME is ‘kvm’, then raw value will be 0x0176617264736b766d.
Example
A classless route adds specified route in clients routing table. In our example, it will add
According to RFC 3442: The first part is the netmask («18» = netmask /24). Second part is significant part of destination network («A00000» = 160.0.0). Third part is IP address of gateway («0A016501» = 10.1.101.1). Then There are parts of the default route, destination netmask (0x00 = 0.0.0.0/0) followed by default route (0x0A016501 = 10.1.101.1)
Much more robust way would be to use built in variables, previous example can be rewritten as:
DHCP Option Sets
Sub-menu: /ip dhcp-server option sets
This menu allows combining multiple options in option sets, which later can be used to override default DHCP server option set.
| Property | Description |
|---|---|
| name (string; Default: ) | Name of the option set. |
| options (list; Default: ) | List of options defined in options menu. |
Vendor Classes
Since 6.45beta6 version RouterOS support vendor class id matcher. The vendor class is used by DHCP clients to optionally identify the vendor and configuration.
| Property | Description |
|---|---|
| name (string; Default: ) | Self explained |
| sever (string; Default: all) | Specific DHCP server to match |
| address-pool (string; Default: ) | Address pool for a particular Vendor ID (VID) |
| vid (string; Default: ) | Vendor Class ID matcher |
Example
In the following configuration example, we will give an IP address from a particular pool for an Android based mobile phone. We will use the RouterBOARD with a default configuration
Configure vendor-class-id matcher. DHCP servers configuration remains default
Connect your mobile phone to the device to receive an IP address from 172.16.16.0 network
Configuration Examples
To simply configure DHCP server you can use a setup command.
First, you configure IP address on the interface:
Then you use setup command which will automatically ask necessary parameters:
That is all. You have configured an active DHCP server.
Manual:IP/DHCP Client
Applies to RouterOS: v3, v4 +
Contents
Summary
The MikroTik RouterOS DHCP client may be enabled on any Ethernet-like interface at a time. The client will accept an address, netmask, default gateway, and two dns server addresses. The received IP address will be added to the interface with the respective netmask. The default gateway will be added to the routing table as a dynamic entry. Should the DHCP client be disabled or not renew an address, the dynamic default route will be removed. If there is already a default route installed prior the DHCP client obtains one, the route obtained by the DHCP client would be shown as invalid.
RouterOS DHCP cilent asks for following options:
Option
DHCP client has a possibility to set up options that are sent to DHCP server. For example, hostname and MAC address. Syntax is same as for DHCP server options.
Note: This feature is available since RouterOS 6.0
Currently, there are three variables that can be used in options:
DHCP client default options include these default Options:
| Name | code | value |
|---|---|---|
| clientid_duid | 61 | 0xff$(CLIENT_DUID) |
| clientid | 61 | 0x01$(CLIENT_MAC) |
| hostname | 12 | $(HOSTNAME) |
Starting from v5.8 DHCP Client can receive delegated prefixes from DHCPv6 server. Currently received prefix is added to IPv6 pool, which later can be used for example in pppoe server configuration. Starting from v5.9, DHCPv6 client configuration was moved to /ipv6 sub-menu. Read-more >>
Quick setup example
Add a DHCP client on ether1 interface:
After interface is added, you can use «print» or «print detail» command to see what parameters DHCP client acquired:
Note: If interface used by DHCP client is part of VRF configuration, then default route and other received routes from DHCP server will be added to VRF routing table.
Properties
Sub-menu: /ip dhcp-client
Status
Command /ip dhcp-client print detail will show current status of dhcp client and read-only properties listed in table below:
| Property | Description |
|---|---|
| address (IP/Netmask) | IP address and netmask, which is assigned to DHCP Client from the Server |
| dhcp-server (IP) | IP address of the DHCP server. |
| expires-after (time) | Time when the lease expires (specified by the DHCP server). |
| gateway (IP) | IP address of the gateway which is assigned by DHCP server |
| invalid (yes | no) | Shows whether configuration is invalid. |
| netmask (IP) | |
| primary-dns (IP) | IP address of the first DNS resolver, that was assigned by the DHCP server |
| primary-ntp (IP) | IP address of the primary NTP server, assigned by the DHCP server |
| secondary-dns (IP) | IP address of the second DNS resolver, assigned by the DHCP server |
| secondary-ntp (IP) | IP address of the secondary NTP server, assigned by the DHCP server |
| status (bound | error | rebinding. | requesting. | searching. | stopped) | Shows the status of DHCP Client |
Menu specific commands
| Property | Description |
|---|---|
| release (numbers) | Release current binding and restart DHCP client |
| renew (numbers) | Renew current leases. If the renew operation was not successful, client tries to reinitialize lease (i.e. it starts lease request procedure (rebind) as if it had not received an IP address yet) |
Examples
Lease script example
Since RouterOS v6.39rc33, it is possible to execute a script when DHCP client obtains new lease or loses existing. This is an example script that automatically adds a default route with routing-mark=WAN1 and removes it when the lease expires or is removed.
Resolve default gateway when ‘router’ (option3) is from different subnet
In some cases administrators tend to set ‘router’ option which cannot be resolved with offered IP’s subnet. For example, DHCP server offers 192.168.88.100/24 to the client and option 3 is set to 172.16.1.1. This will result in unresolved default route:
To fix this we need to add /32 route to resolve the gateway over ether1, which can be done by running script below each time DHCP client gets an address
Now we can further extend the script, to check if address already exist, and remove the old one if changes are needed
Mikrotik DNS и DHCP для Active Directory
В версии 6.47 RouterOS Mikrotik наконец добавил возможность заводить в DNS разные типы записей — CNAME, FWD, MX, NS, NSDOMAIN, SRV и TXT (раньше были только А- и АААА-записи). А это значит, что теперь роутер можно использовать в качестве DNS для домена Active Directory с возможностью переноса на него и DHCP-сервера тоже.
Если открыть на доменном контроллере панель управления dns и посмотреть настройки зоны домена — вы увидите несколько десятков SRV-записей, указывающих на доменный контроллер. Клиентские машины обращаются за ними к dns-серверу в попытке выяснить, какой сервер является доменным контроллером для указанном на них домене: запрашивая SRV-записи с разными значениями, в ответ они получают FQDN-имя доменного контроллера, которое резолвится в ip через запись типа А.
Я не ставил себе задачу разбирать смысл каждой записи в рамках этого поста, но (при желании) это всё можно нагуглить. В этой заметке я приведу набор SRV-записей, которого достаточно для стабильной работы домена с перенесенными на Mikrotik DNS и DHCP.
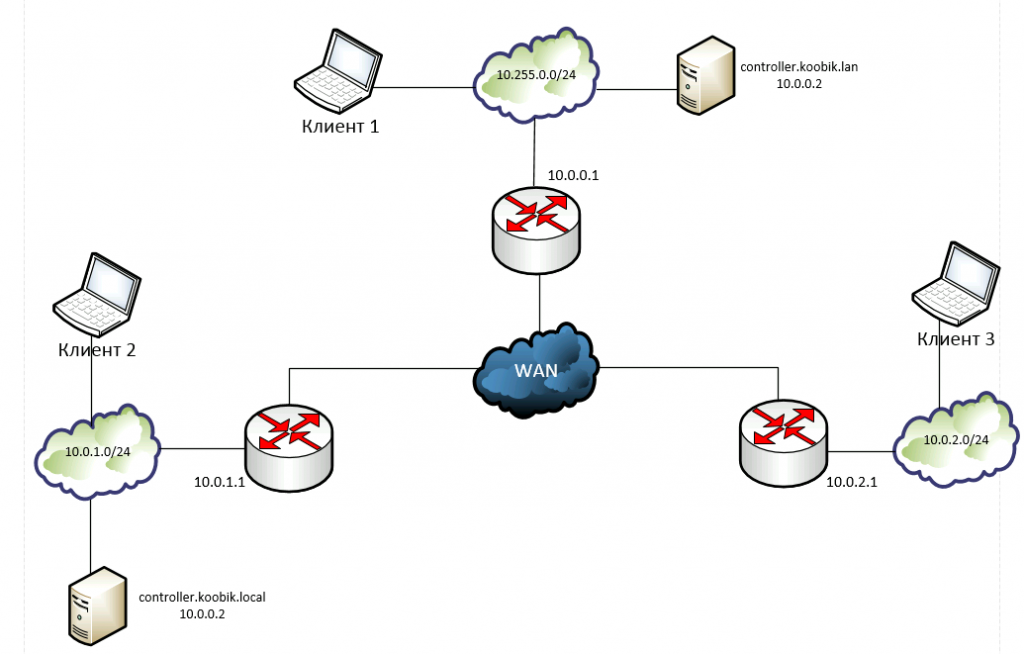
Итак, на вашем роутере уже настроены DNS- и DHCP-серверы (отдельно на этом пункте останавливаться нет смысла, вокруг полно статей на эту тему). В примерах ниже — на микротике настроен ip 10.0.0.1/24 (который является для клиентов и шлюзом, и dns-сервером), а доменный контроллер имеет имя controller.koobik.lan и ip 10.0.0.2. Сначала добавим А-запись для контроллера:
Теперь добавим SRV-записи для Active Directory:
Теперь клиентские машины домена могут без проблем найти в сети доменный контроллер. Однако, помимо имени, контроллер создаёт несколько уникальных ID домена и в классическом варианте так же помещает их в dns. Отловить их можно в IP — DNS — Cache после авторизации клиентской машины в Active Directory, у них будет статус unknown; их достаточно создать вручную с параметрами srv-port=389 srv-priority=0 srv-target=controller.koobik.lan srv-weight=100 type=SRV. Они имеют такой вид:
Эта схема позволяет добавить в dns любое количество доменов и контроллеров в рамках одной сети — достаточно для каждого из них создать А-запись контроллера и пачку SRV-записей из образца выше; количество ограничено только вашей фантазией и объемом памяти mikrotik; это удобно, если вам достался зоопарк систем и нужно быстрое решение по их совместной работе с централизованным управлением сетью через роутер.
Усложним задачу. У нас есть распределенная сеть с двумя доменами (koobik.lan и koobik.local), на роутерах настроена маршрутизация, клиентские машины видят друг друга по серым ip и привязаны к разным доменам, при этом клиенты могут физически перемещаться между подсетями.
Я разберу первый вариант, т.к. второй является его производным. Для этих целей у себя я задействовал виртуалку с ubuntu, но можно использовать и внутренние скрипты микротика.
Сначала разрешаем ssh на всех микротиках:
В целях безопасности создадим правило, разрешающее ssh-соединения только с конкретного ip (в примере — с ip 10.0.0.10).
На виртуалке делаем SSH авторизацию без пароля на микротиках, чтобы она могла самостоятельно обращаться к ним по расписанию.
Создаём скрипты, один будет собирать со всех микротиков данные об арендованных адресах и хостнеймах клиентов (export_dhcp.sh), а затем генерировать команды для создания статических записей в dns головного микротика и помещать их во второй файл (add_dns.sh).
Второй файл (add_dns.sh) будет наполняться и очищаться командами из первого и никаких действий с ним не требуется. Открываем на редактирование export_dhcp.sh и копипастим туда код (скорректировав ip и учётки на свои).
Удаление нужно из-за того, что микротик допускает существование двух одинаковых А-записей с разными ip.
Создание двух записей с разными dns-суффиксами нужно для обращения с одного клиента на другой по имени хоста. Дело в том, что если клиент относится к какому-либо домену, то при любом обращении по имени без суффикса он автоматически подставляет суффикс своего домена. А т.к. у нас два разных домена — клиенты могут быть в любом из них.
Разберём по частям одну из команд:
ssh admin@10.0.0.1 ‘ip dhcp-server lease print terse where status=bound’
По ssh-ключу с логином admin подключаемся к микротику 10.0.0.1 и выполняем на нём команду ip dhcp-server lease print terse where status=bound.
Оставляем только те строки, в которых есть имя хоста.
0 address=10.0.0.14 mac-address=00:0C:29:D9:89:0C client-id=ff:9f:6e:85:24:0:2:0:0:ab:11:31:f2:a1:5a:46:98:8:43 address-lists=»» server=dhcp1 dhcp-option=»» status=bound expires-after=8m9s last-seen=1m51s active-address=10.255.0.14 active-mac-address=00:0C:29:D9:89:0C active-client-id=ff:9f:6e:85:24:0:2:0:0:ab:11:31:f2:a1:5a:46:98:8:43 active-server=dhcp1 host-name=client1
Пример выдачи — получаем список с активными арендами.
Вытаскиваем из выдачи значения active-address и host-name с помощью обрезки через sed
DHCP Client
Summary
The DHCP (Dynamic Host Configuration Protocol) is used for the easy distribution of IP addresses in a network. The MikroTik RouterOS implementation includes both server and client parts and is compliant with RFC 2131.
The MikroTik RouterOS DHCP client may be enabled on any Ethernet-like interface at a time. The client will accept an address, netmask, default gateway, and two DNS server addresses. The received IP address will be added to the interface with the respective netmask. The default gateway will be added to the routing table as a dynamic entry. Should the DHCP client be disabled or not renew an address, the dynamic default route will be removed. If there is already a default route installed prior to the DHCP client obtaining one, the route obtained by the DHCP client would be shown as invalid.
RouterOS DHCP client asks for the following options:
Option
DHCP client has the possibility to set up options that are sent to the DHCP server. For example, hostname and MAC address. The syntax is the same as for DHCP server options.
Currently, there are three variables that can be used in options:
DHCP client default options include these default Options:
| Name | code | value |
|---|---|---|
| clientid_duid | 61 | 0xff$(CLIENT_DUID) |
| clientid | 61 | 0x01$(CLIENT_MAC) |
| hostname | 12 | $(HOSTNAME) |
DHCP Client can receive delegated prefixes from the DHCPv6 server. The currently received prefix is added to the IPv6 pool, which later can be used for example in PPPoE server configuration. DHCPv6 client configuration can be found in the /ipv6 sub-menu
Setup example
Add a DHCP client on ether1 interface:
After the interface is added, you can use the «print» or «print detail» command to see what parameters the DHCP client acquired:
If the interface used by the DHCP client is part of the VRF configuration, then the default route and other received routes from the DHCP server will be added to the VRF routing table.
DHCP client status can be checked with:
Examples
Lease script example
It is possible to execute a script when a DHCP client obtains a new lease or loses an existing one. This is an example script that automatically adds a default route with routing-mark=WAN1 and removes it when the lease expires or is removed.
Resolve default gateway when ‘router’ (option3) is from a different subnet
In some cases, administrators tend to set the ‘router’ option which cannot be resolved with offered IP’s subnet. For example, the DHCP server offers 192.168.88.100/24 to the client, and option 3 is set to 172.16.1.1. This will result in an unresolved default route:
To fix this we need to add /32 route to resolve the gateway over ether1, which can be done by the running script below each time the DHCP client gets an address
Now we can further extend the script, to check if the address already exist, and remove the old one if changes are needed
DHCP Server
The DHCP (Dynamic Host Configuration Protocol) is used for the easy distribution of IP addresses in a network. The MikroTik RouterOS implementation includes both server and client parts and is compliant with RFC 2131.
The router supports an individual server for each Ethernet-like interface. The MikroTik RouterOS DHCP server supports the basic functions of giving each requesting client an IP address/netmask lease, default gateway, domain name, DNS-server(s) and WINS-server(s) (for Windows clients) information (set up in the DHCP networks submenu)
In order for the DHCP server to work, IP pools must also be configured (do not include the DHCP server’s own IP address into the pool range) and the DHCP networks.
It is also possible to hand out leases for DHCP clients using the RADIUS server; the supported parameters for a RADIUS server are as follows:
DHCP server requires a real interface to receive raw ethernet packets. If the interface is a Bridge interface, then the Bridge must have a real interface attached as a port to that bridge which will receive the raw ethernet packets. It cannot function correctly on a dummy (empty bridge) interface.
Lease Store Configuration
This sub-menu allows the configuration of how often the DHCP leases will be stored on disk. If they would be saved on a disk on every lease change, a lot of disk writes would happen which is very bad for Compact Flash (especially, if lease times are very short). To minimize writes on disk, all changes are saved on disk every store-leases-disk seconds. Additionally, leases are always stored on disk on graceful shutdown and reboot.
Leases
DHCP server lease submenu is used to monitor and manage server leases. The issued leases are shown here as dynamic entries. You can also add static leases to issue a specific IP address to a particular client (identified by MAC address).
Generally, the DHCP lease is allocated as follows:
A client may free the leased address. The dynamic lease is removed, and the allocated address is returned to the address pool. But the static lease becomes busy until the client reacquires the address.
IP addresses assigned statically are not probed!
Parameters
Properties
Network
Rate limiting
It is possible to set the bandwidth to a specific IPv4 address by using DHCPv4 leases. This can be done by setting a rate limit on the DHCPv4 lease itself, by doing this a dynamic simple queue rule will be added for the IPv4 address that corresponds to the DHCPv4 lease. By using the rate-limit parameter you can conveniently limit a user’s bandwidth.
For any queues to work properly, the traffic must not be FastTracked, make sure your Firewall does not FastTrack traffic that you want to limit.
First, make the DHCPv4 lease static, otherwise, it will not be possible to set a rate limit to a DHCPv4 lease:
Then you can set a rate to a DHCPv4 lease that will create a new dynamic simple queue entry:
By default allow-dual-stack-queue is enabled, this will add a single dynamic simple queue entry for both DCHPv6 binding and DHCPv4 lease, without this option enabled separate dynamic simple queue entries will be added for IPv6 and IPv4.
If allow-dual-stack-queue is enabled, then a single dynamic simple queue entry will be created containing both IPv4 and IPv6 addresses:
RADIUS Support
Since RouterOS v6.43 it is possible to use RADIUS to assign a rate limit per lease, to do so you need to pass the Mikrotik-Rate-Limit attribute from your RADIUS Server for your lease. To achieve this you first need to set your DHCPv4 Server to use RADIUS for assigning leases. Below is an example of how to set it up:
After that, you need to tell your RADIUS Server to pass the Mikrotik-Rate-Limit attribute. In case you are using FreeRADIUS with MySQL, then you need to add appropriate entries into radcheck and radreply tables for a MAC address, that is being used for your DHCPv4 Client. Below is an example for table entries:
Ошибка визуализации кода макроса: задано недействительное значение для параметра «com.atlassian.confluence.ext.code.render.InvalidValueException»
Alerts
To find any rogue DHCP servers as soon as they appear in your network, the DHCP Alert tool can be used. It will monitor the ethernet interface for all DHCP replies and check if this reply comes from a valid DHCP server. If a reply from an unknown DHCP server is detected, an alert gets triggered:
When the system alerts about a rogue DHCP server, it can execute a custom script.
DHCP Options
With the help of the DHCP Option list, it is possible to define additional custom options for DHCP Server to advertise. Option precedence is as follows:
This is the order in which the client option request will be filled in.
According to the DHCP protocol, a parameter is returned to the DHCP client only if it requests this parameter, specifying the respective code in the DHCP request Parameter-List (code 55) attribute. If the code is not included in the Parameter-List attribute, the DHCP server will not send it to the DHCP client, but since RouterOS v7.1rc5 it is possible to force the DHCP option from the server-side even if the DHCP-client does not request such parameter:
Properties
RouterOS has predefined variables that can be used:
Now it is also possible to combine data types into one, for example: «0x01’vards’$(HOSTNAME)»
For example if HOSTNAME is ‘kvm’, then raw value will be 0x0176617264736b766d.
Example
Classless Route
A classless route adds a specified route in the clients routing table. In our example, it will add
According to RFC 3442: The first part is the netmask («18» = netmask /24). Second part is significant part of destination network («A00000» = 160.0.0). Third part is IP address of gateway («0A016501» = 10.1.101.1). Then There are parts of the default route, destination netmask (0x00 = 0.0.0.0/0) followed by default route (0x0A016501 = 10.1.101.1)